A complete guide for pricing your photography
Jan 8, 2024
Natasha Martinez & Mark Maryanovich

Dunja Djudjic is a multi-talented artist based in Novi Sad, Serbia. With 15 years of experience as a photographer, she specializes in capturing the beauty of nature, travel, and fine art. In addition to her photography, Dunja also expresses her creativity through writing, embroidery, and jewelry making.
Share:
A complete guide for pricing your photography
Jan 8, 2024
Natasha Martinez & Mark Maryanovich
Dunja Djudjic is a multi-talented artist based in Novi Sad, Serbia. With 15 years of experience as a photographer, she specializes in capturing the beauty of nature, travel, and fine art. In addition to her photography, Dunja also expresses her creativity through writing, embroidery, and jewelry making.
Share on:
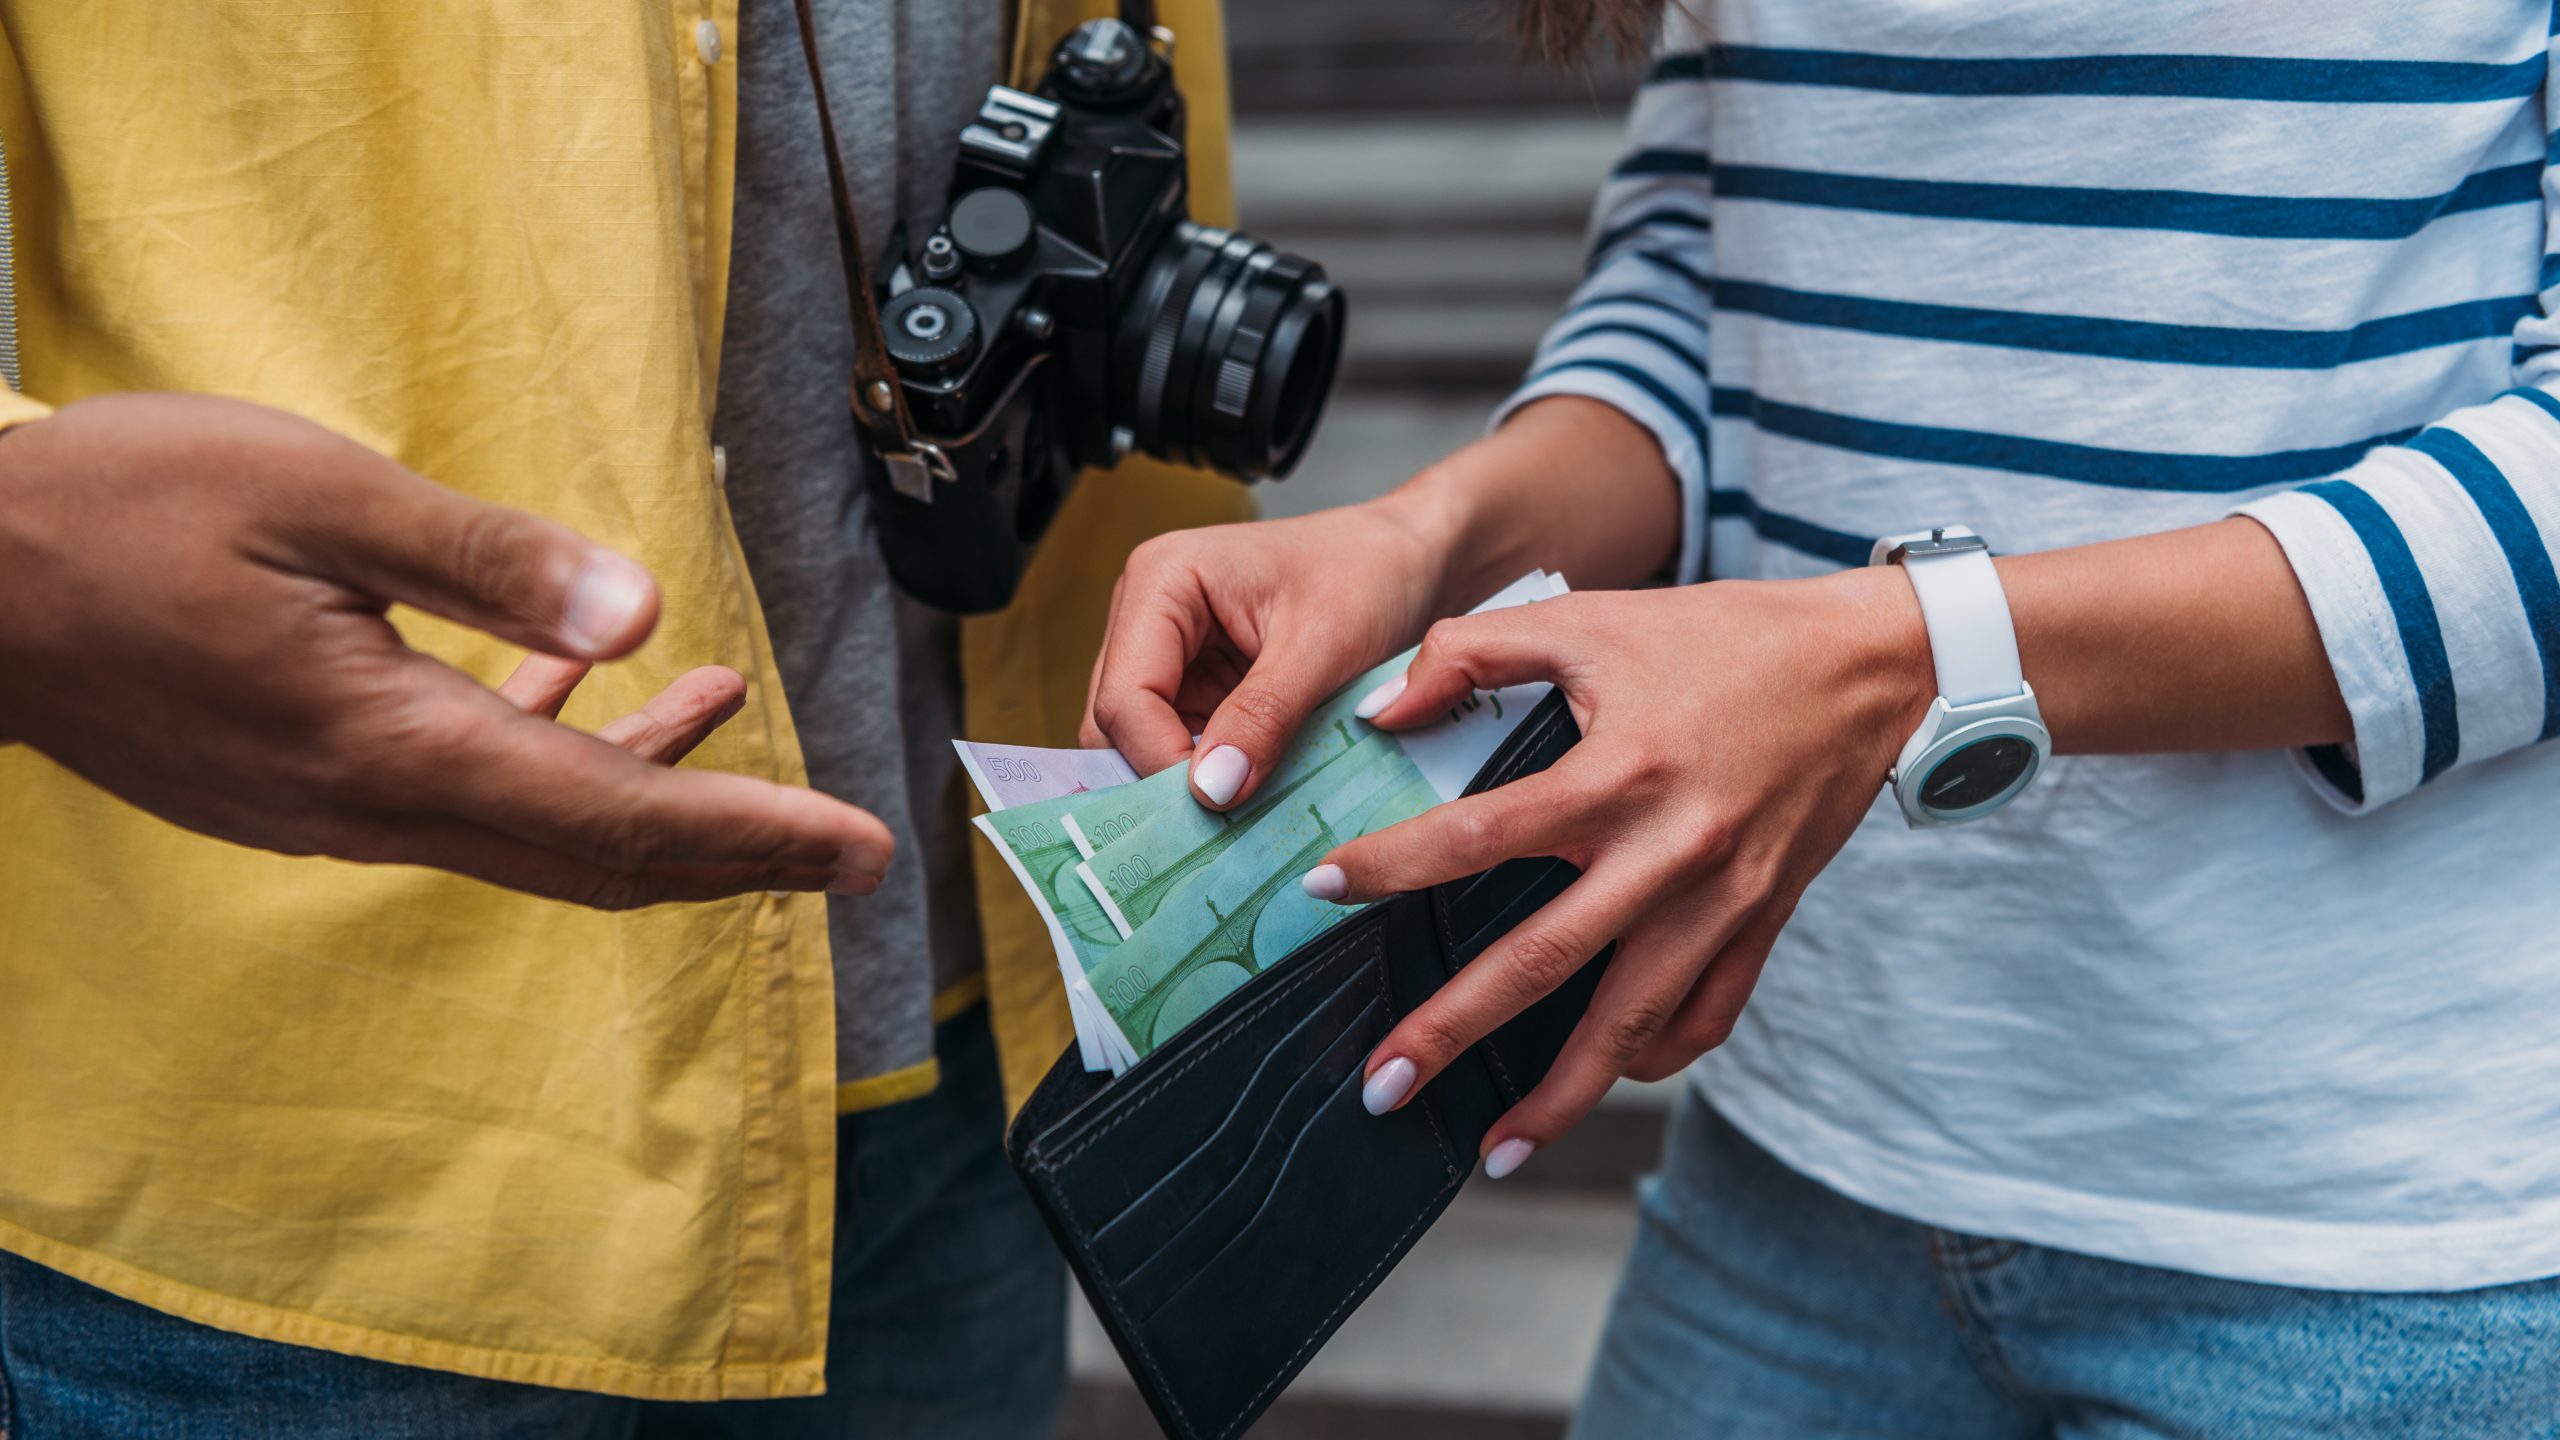
One of the essential aspects of doing photography for a living is pricing it correctly. So, it’s time to look at our pricing.
Pricing? You might think, and a myriad of statements come to mind: I don’t even know what I’m selling yet; I don’t know how to sell; I don’t know who I’m selling to, etc., etc., etc. The response to all of those statements stems from pricing and reverse engineering.
This article is a chapter from Natasha’s and Mark’s book Photography Business Basics: 10 Years of Photography Business Knowledge in 10 Short Chapters.

Pricing is both art and mathematics, and it may take weeks, months or even years to get it right. So it’s important to have a formula to work with from the outset.
Again, let’s begin with the end in mind. Regardless of how much you’re currently earning from photography (e.g., $0/year or $50,000/year), think about exactly how much you would like to earn in the year ahead. Write this number down.
Now, let’s go back to your spending log and look at your expenses.
Expenses for a business owner fall into three categories:
- Personal: Examples include groceries, clothing, entertainment, etc.
- COGS (Cost Of Goods Sold): COGS are expenses that you incurred because you needed to buy an Item specifically for a Shoot. Examples include location fees, props for a specific Shoot and that Shoot only, travel to the Photoshoot, merchant credit card fees (PayPal/Venmo/Stripe Fees) on payments from specific Shoots, etc. If you have no Photoshoots and therefore no sales, you will not have any COGS
- Overhead and General Expenses: O&GE are expenses that you incur whether or not you have any sales. These include your website and marketing materials (more on this later), insurance, your office/studio rent and utilities, taxes, etc.
If you are just starting out, you may not have any COGS or O&GE to look at. Or perhaps you already are in business and have these numbers to reference. Either way, the Professional Photographers of America (PPA)’s benchmark recommendations are:
- COGS: 25% of your sales
- O&GE: 35% of your sales
- Total COGS + O&GE: 60% of your sales
Before we go any further, now seems like a great place to mention how highly we recommend becoming a member of the PPA. A lot of our knowledge we learned from the PPA’s extensive webisode series on the business of photography. Also, membership includes being listed in their Find A Photographer website (great for marketing), and certain types of insurance.
We’d also like to mention again, that this information is not a substitute for engaging a qualified accountant and/or bookkeeper.
And once you hire a qualified accountant and/or bookkeeper it is still worthwhile to know, understand and keep on top of your income and expenses, because, after all, it is your money, and your sales and expenditures are a great barometer for your business.
Also, by keeping track of your sales and spending in an organized fashion, your accountant and/or bookkeeper will love you for it, and you may be able to reduce this expense (see Chapter 4) as you will reduce the time they need to spend on logging your income and categorizing your expenses.
From here, we’re going to presuppose you’ve had some sales and incurred some COGS and O&GE. We’ve included some suggested categories to include in a spreadsheet of your own.
Each category can have the same headings as your spending log, and you might want to keep these categories on a different sheet within the same spreadsheet of your spending log, so that you can easily copy and paste each expenditure into its appropriate category after you’ve logged it.
We like to group these categories by month, i.e. your COGS spreadsheet will have the categories listed vertically under January, then listed vertically again for February and so on. We do the same for the O&GE categories, and for the Personal expense categories on different sheets. This enables you to look at your spending each month.
Again, please consult with a qualified accountant and/or bookkeeper regarding the current specifications of what can be deducted and how much can be deducted as legitimate business expenses.
The point here is to just keep track of your expenses in the categories so you can adjust toward the benchmarks as necessary.
Your accountant and/or bookkeeper will most likely encourage you to use a financial software system such as Quickbooks. In the beginning, we think it’s important to be incredibly specific on tracking and categorizing each and every expense, and doing this manually using a spreadsheet allows this to happen.
COGS Categories:
- Accessories/Packaging
- Contract Labor: production and assistant labor
- Editing, Retouching, Album Design, etc.
- Frame and Album Expense
- Lab & Printing Expense
- Location Rentals
- Meals Related to Shoot
- Merchant Credit Card Fees: online sales transaction fees
- Music Licensing Fees
- Photographic supplies: items related to a specific job
- Production Employee Payroll
- Production Employee Payroll Taxes
- Props/Accessories: only those related to a specific Photoshoot
- Sales Commissions
- Shipping Costs (customer-related)
- Travel for Specific Client Work:
- Airfare
- Lodging
- Transportation
When it comes to COGS, it’s important at this point for you to think through how you will be delivering your Images to your Clients.
Will you be delivering on a thumb drive or as finished, framed prints? If so, include this as a COGS.
If you plan to only deliver digital Images (and you may be leaving money on the table if you are – more on this later), then this depends on your Gallery delivery system (more on this later also). If your Gallery delivery system comes with your website hosting platform or studio management software, then this could fall under your O&GE Marketing Expense. If it is a thumb drive you deliver, then this is a COGS expense under Accessories/Packaging.
Again, your bookkeeper/accountant will know best. The idea here is to have the expense logged, somewhere in your master spreadsheet.
O&GE Categories:
- General Expenses
- Marketing:
- Advertising
- Display Rental/Expense
- Donations
- Entertainment
- Marketing: General
- Parking
- Postage: Promotions
- Printing: Promotions
- Promotions: Events
- Referrals
- Taxis
- Website/Hosting Expenses
- Employee Expense
- Owner’s Compensation
- Overhead
- Insurance
- Maintenance
- Property Tax
- Rent
- Storage
- Utilities
- O&GE Categories: Continued:
- Administrative
- Accounting
- Auto: Car Rentals/Insurance/Repairs
- Auto: Fuel
- Auto: Mileage Reimbursements
- Education Dues and Subscriptions
- Interest and Exchange Rate
- Legal
- Office
- Postage: not related to a specific Client
- Professional Fees
- Props/Accessories: not related to one specific Photoshoot
- Taxes & Licenses
- Telephone
Capital expenditures - Items over $500: computers / cameras / lenses / etc.
You should treat this as a bill, and set aside (save) money for upgrading your equipment, computer, phone every two to five years.
Personal Expense Categories:
- ATM withdrawal fees
- Cards and gifts for family and friends
- Clothing
- Entertainment
- General: any personal expense that doesn’t fall into any of the other categories
- Giving: the dollar you gave to a homeless person, the couple bucks you put in the Salvation Army kettle, etc.
- Groceries
- Grooming
- Household
- Meals out
- Medical
- Postage: mailing cards and items to your family and friends
While you might not have expenses for every category right now, it’s a good idea to list them in case you need them in the future.
And those receipts including the ones for all the single bananas you bought at Trader Joe’s throughout the month that are currently living in one envelope? At the end of the month they are transferred into a different envelope, one you created and labeled with the name of each category. E.g.:
- An envelope called “COGS”
- An envelope called “O&GE”
- An envelope called “Personal Expenses”
So now ideally you have your envelopes, master spreadsheet with your COGS, O&GE and Personal Expense sheets, and the expenses you logged for the past 30 days entered into their appropriate categories. Bonus points if you’ve created the categories for the months ahead, ready and waiting to be filled in with your upcoming expenses.
Now tally up your sales, COGS and O&GE, do the math and see if they fall into the PPA Benchmarks of:
- 25% for COGS
- 35% for O&GE
If not, it’s time to adjust by asking yourself the same question from Chapter 4:
What are five ways I can reduce spending?
After you’ve come up with your five answers, add your total COGS and O&GE and subtract this number from the amount you would like to earn in the year ahead.
To keep things simple, let’s say the amount you’d like to earn annually is $100,000.
This is an ambitious goal, though it can most certainly be done. This leads nicely to another resource we highly recommend: Charles Lewis Photography.
Charles and his team provide valuable tips on how to earn $100,000 annually as a Photographer. While his techniques might not be applicable to your own photography business style, the principles he teaches are extremely helpful to know.
According to Salary.com, the average freelance Photographer salary in California is $49,557 as of July 25, 2023, but the range typically falls between $43,524 and $57,383.
Whether this is gross or net is unclear.
Getting back to the basics, gross income means your total sales before any expenses (COGS and O&GE) while net means your income after your COGS and O&GE have been subtracted.
When you thought about exactly how much you would like to earn in the year ahead at the beginning of this chapter (we’re going with $100,000 for simplicity’s sake), this would be your gross income.
Now that we’ve subtracted our 60% for COGS and O&GE, we’re left with $40,000, your net income.
From this $40,000, you will eventually be allocating an amount for your time and labor.
This is your Photographer’s salary, and technically, you’ll use your Photographer’s salary and Photographer’s salary alone to pay for your personal expenses (rent, food, entertainment, the occasional vacation, etc.).
The amount left over after deducting your Photographer’s salary will be used for building your retirement nest egg, emergency, contingency and sinking funds (see Dave Ramsey’s Total Money Makeover), and potentially, bonuses.
If $40,000 annually in net profit works for you in terms of your personal expenses, various funds and saving for after your exit strategy, then great! We can proceed.
If not, adjust your gross income number to more than $100,000 and do the math again, subtracting your COGS and O&GE (that are ideally at the benchmark percentages).
Once you have a net income figure that you’re happy with, it’s time to ask yourself the next question:
How many Photoshoots would you ideally like to be paid to do each week, which adds up to each month, and subsequently each year?
Before you answer this question, let’s factor in your time.
It’s a good idea to type this out in a document you can save, as it will serve as the basis for part of your systems that we’ll get to in Chapter 10.
List all the steps you perform to fulfill a Photoshoot, along with the time each step takes:
For example, a 1-Hour Photography Session might be stepped out as follows:
- Client research: 1 Hour
- Pre Photoshoot consultation with Client: 45 Minutes
- Contracting and invoicing your Client: 30 Minutes
- Location research/studio booking: 45 Minutes
- Actual Photography Session: 1 Hour
- Total travel time to and from Photoshoot 1 Hour
- Importing, backing up, editing and Gallery upload time: 2 Hours
- In Person Sales/order fulfillment: 2 Hours
- Total Hours: 9 Hours
It’s important to keep in mind here that we are not including the time you’ll be spending on marketing, sales, administration, business planning, etc. This is strictly the hours you spend actually being a Photographer.
Conservatively, it’s safe to say that as a business owner, you should be spending 10 to 20 hours a week on business planning, marketing, sales and administration for a total of 40 to 80 hours each month or 480 to 960 hours each year.
It’s also helpful to keep in mind that the average employee works 50 hours each week or 200 hours each month and 2400 hours each year.
Now let’s return to the question: How many Photoshoots would you ideally like to be paid to do each week, which adds up to each month, and subsequently each year?
Divide your ideal gross income figure by this number of Photoshoots. Let’s say you’d like to do:
1 Photoshoot per week / work 9 hours per week as a Photographer
This equals:
4 Photoshoots per month / working 36 hours per month as a Photographer
This equals:
48 Photoshoots per year / working 432 hours per year as a Photographer
$100,000 per year / 48 = $2083.33
This means you would have to charge $2083.33 per Photoshoot.
If you’d like to shoot four times per week, or 16 times per month, or 192 times per year, then the math looks like this:
4 Photoshoots per week / working 36 hours per week as a Photographer
This equals:
16 Photoshoots per month / working 144 hours per month as a Photographer
This equals:
192 Photoshoots per year / working 1728 hours per year as a Photographer
$100,000 per year / 192 = $520.83
This means you would have to charge $520.83 per Photoshoot.
Yes, this is a big difference, and yes, most likely you will be offering longer or shorter shoots, different packages and different products at different price points (as you should). And also yes, many times you will be working at discounted rates just to keep the sales coming in.
The point being here is to have a benchmark based on your expenses that serves as the starting point for the packages and products you will offer, along with their prices. This benchmark also begins to delineate the type of Client you will be serving and the products and services you will need to provide to maintain this benchmark.
Having these benchmark prices also lets your Client know when they are getting a deal, and you should let them know that (more on this later).
Also importantly, you are looking at your time. Again, we are not including the time you’ll be spending on marketing, sales, administration, business planning, etc. These are strictly the hours you spend actually being a Photographer.
To figure out your Photographer’s salary, you want to establish an hourly rate for yourself, one that takes into account the current minimum wage along with your skill and experience. Arbitrarily and to keep things simple, let’s set your pay rate at $20 per hour.
At $20 per hour, you would earn $180 for your labor involved in one 1-Hour Photoshoot that involves 9 hours of your time and labor.
At one 1-Hour Photoshoot per week, your Photographer’s annual salary would be:
48 x $180 = $8640
At four 1-Hour Photoshoots per week, your Photographer’s annual salary would be:
192 x $180 = $34,560
Again, a big difference. And you might be asking, what does this matter, how much my salary as a Photographer is, isn’t everything that’s left over after subtracting my COGS and O&GE just going to be mine anyways?
The answer is, technically, yes.
Though there are at least a couple of different reasons why you should take the time to figure this out.
The first reason is that if your exit strategy includes hiring a Photographer to replace you, or selling your business to another entity, it’s essential to know how much the Photographer’s salary is.
The second reason is if you forget to include compensating yourself for your time, your pricing may include only the costs needed to cover your expenses, with not much or nothing left over for you to pay for things like food and clothing.
Third, the money you get to pay yourself will keep you motivated as you work extremely hard on building and growing your business.
The importance of establishing your Photographer’s salary becomes even more clear as we now learn and implement a strategy for managing your cash flow.
Put simply, cash flow “is a real or virtual movement of money: A cash flow in its narrow sense is a payment (in a currency), especially from one central bank account to another; the term ‘cash flow’ is mostly used to describe payments that are expected to happen in the future, are thus uncertain and therefore need to be forecast with cash flows.”(Thanks Wikipedia!)
It’s good practice to receive payment for your Photoshoot by splitting the total amount into an advance and balance. The advance can be as little or as much as you like (say, 20% to 50%) that’s due as soon as you confirm the shoot date with your Client, to hold that day and time for them. (Refunds and cancellations will be discussed in Chapter 7).
The balance should be due once their Images are ready to be delivered and you should require payment of the balance before you deliver your work (more on this in Chapter 7 as well).
The reason to split the total payment up is two-fold:
One, it makes for better cash flow as money does tend to get spent as soon as you have it, and splitting it up enables you to budget better.
Two, it takes the pressure off you and the Client as it seems to beget higher expectations if payment is paid in full before the Photoshoot. Also, if something happens and you do have to refund the Client’s money, 20% to 50% will be easier for you to manage than the full 100%.
Ideally, you’re using a studio management software (covered in Chapter 9) that keeps a record of all of your invoices, money received and money due. Even still, it’s also a good idea to keep a running budget of your own, a separate sheet within your Spending Log, COGS and O&GE spreadsheet, that lists the money you have received and are expecting.
Also ideally, you have a business checking and savings account set up, and your bank offers a savings goal account feature (like Bank Of America does). With this feature, you can set up different accounts within your savings account and give them different names.
You can then allocate specific amounts from your savings account into the sub-goal accounts. The money is still in your savings account and accessible, it’s just been grouped into different categories, like so:
Income Account: your initial Savings Account
Within this account, you’ll create:
- Your COGS account
- Your O&GE account
- Your tax account: where you’ll reserve a percentage of money for taxes
- Your Owner’s compensation account: this is where your Photographer’s salary lives
- Your profit account: this is your celebration account: bonus money that does not go back into your business or get used for your personal expenses
Once you have these sub-accounts set up, each and every time you receive a payment (advance or balance), transfer the funds (if necessary) to your Income Account.
From there, transfer:
- 25% of the payment amount into your COGS account
- 35% of the payment amount into your O&GE account
- 15% of the payment amount into your tax account
- 20% of the payment amount into your Owner’s compensation account
- 5% of the payment amount into your profit account
Then, pay for your COGS out of your COGS account, your O&GE bills out of your O&GE account and your personal expenses out of your Owner’s compensation account.
Yes, there will be times when you need to transfer money from your owner’s compensation account or profit account to cover your COGS or O&GE. And yes, 20% of your deposits may or may not cover the salary you worked out in the math formula above.
The point to having this system in place is that it lets you know how your business is doing and if your pricing is where you need it to be.
Don’t touch the funds in your tax account and use this money to pay your quarterly installments (as advised by your bookkeeper and/or accountant), and try not to touch the funds in your profit account.
Saving money is an important discipline to start implementing as a behavioral pattern sooner rather than later. If you find you’re unable to set aside 5% from each deposit, start with 1% and then add another 1% when you can, until you reach 5%.
Use this money for celebrations or to treat yourself at planned times with planned items. Or try to exercise self-discipline and watch this profit sub-account grow. As Albert Einstein once said:
“Compound interest is the eighth wonder of the world. He who understands it, earns it … he who doesn’t … pays it.”
Once you become familiar with money, you’ll learn that it’s very psychological. Seeing your savings grow even at 1% increments creates a very pleasant feeling. Keeping money in a different account somehow stops you from wanting to spend it as you might do if it was just left floating in one master account.
There are endless theories on money management, and one of them is to pay yourself first. By allocating your 20% to your Owner’s compensation first, and then the 15% to your taxes, and then forcing yourself to make due with whatever’s left over for COGS and O&GE will force you to rethink the amounts you’re paying for your Photoshoot-related items, equipment and bills.
Of course, you should never cut corners to sacrifice the quality of the products and services you deliver as that will eventually affect the amount of money coming in and the ultimate success of your business.

Now let’s talk about budgeting.
Budgeting is an important skill for a business owner to master. It is much easier to budget if you know exactly how much money you will earn in each month, and as freelancers, this rarely happens.
Moreover, photography tends to be a seasonal business. You’ll have your busy months and less busy months, depending on the type of Images you offer.
This is where the percentage amounts for your sub-bank accounts come in handy:
If you receive a large Session fee, stick to the percentages, even if the COGS related to this particular Photoshoot do not tally up to 25%, and 35% of this big paycheck greatly exceeds your O&GE. By keeping that money in those sub-accounts, it will be there for the offseason.
While it’s more difficult to budget on predictions, it’s even more important to do so. Budget down to the last dollar you hope will come in for your COGS, O&GE and personal expenses. You can create your monthly budgets on a separate sheet within your Spending Log, COGS and O&GE spreadsheet.
A sample budget might look like this:
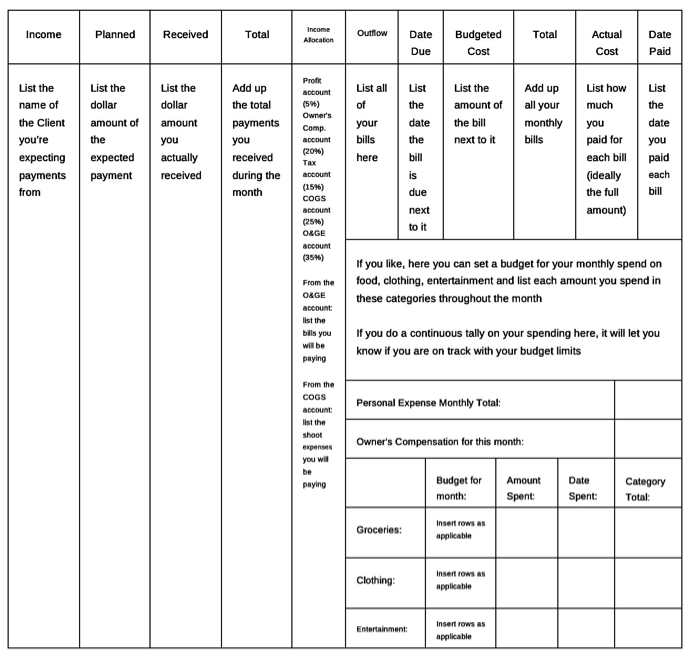
It is worth mentioning here that you should learn and implement a system that works for you. Maybe you like using an adding machine or abacus (today, the stand-alone calculator that isn’t also a phone), pen, pencil or budgeting app. Use what you like and what you’re most comfortable with so that the process is something you will enjoy more and maybe even look forward to.
(If you would like a copy of our Budget Template in Google Sheets or Excel format, please email us with the subject line Templates, and we’ll be happy to send one along!)
While we’re on the subject of budgeting, as a business owner the other skill you’ll want to master is budgeting your time.
There are several apps, theories and blog posts about time management. We find that an effective way to manage all the things you will get to do in terms of running your business is to set aside an hour or so every Friday or Saturday (just some time before the next week starts) and look at your week ahead and the tasks you get to accomplish.
In essence, plan your next week, not your next day. This will allow you to set aside blocks of time, say 2 hours every morning responding to emails and social media posts/comments, 3 hours every afternoon working on your marketing and sales, 2 hours each evening planning and thinking about where your business is going.
The point is if you schedule this way, you can remain flexible and shift things around as the week progresses and days get away from you (it happens). This is much more motivating than just transferring your leftover activities you didn’t get to onto the next day’s list and then the next day’s, then the next day’s and so on.
Again, do this in an app, your Gmail calendar, a day timer, or printable loose-leaf paper that you hole punch and keep in a three ring binder. Use whatever method is most appealing to you.
Alright. Now we have an idea of how much we’d like to charge and how often we’d like to shoot based on our expenses. Excellent. Now it’s time to figure out exactly who we’re going to charge to photograph… But that’s the story for another time.
About Natasha Martinez & Mark Maryanovich
Natasha Martinez has worked side by side with Mark Maryanovich over the past decade. Award-winning photographer Mark Maryanovich has captured artists including Chris Cornell and Billy F Gibbons. He’s created album covers and artwork for Sony, EMI, Warner, and Universal and received two Canadian Country Music Awards for Recording Package of the Year. Mark’s clients include Gibson and Peavey, and his work has been published in Rolling Stone and Billboard. Mark has the honor of providing the autobiography book cover images for rock legends Randy Bachman and Matt Sorum. Because of his work in this genre, the Annenberg Space for Photography selected Mark for their exhibition Country: Portraits of an American Sound, celebrating the icons of country music. You can check out his work on his website and follow him on Instagram
We love it when our readers get in touch with us to share their stories. This article was contributed to DIYP by a member of our community. If you would like to contribute an article, please contact us here.


Join the Discussion
DIYP Comment Policy
Be nice, be on-topic, no personal information or flames.